
 Now . . . you probably never make a mistake like I do . . . but when I do with the Staz On ink on clear acetate . . . it's easy to fix with a spritz of ordinary rubbing alcohol and a paper towel . . . I even use rubbing alcohol to clean my sticky fingers . .
  When I am happy with my image . . . I am ready to adhere it to my mulberry paper collage background.
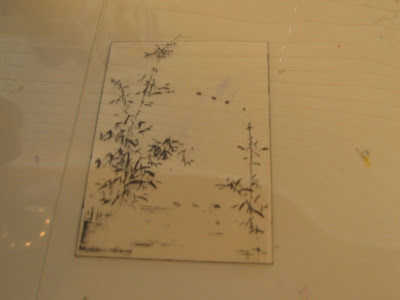 My Xyron machine works nicely to put sticky stuff on the back of my clear acetate image . . . I understand that JudiKins Diamond Glaze and Ranger Glossy Accents work, as well . . .
 I hope you liked this technique . . . Have fun!!!!!


14 comments:
What a fabulous technique Michi and such great instructions, I am sure even I can follow them!
I didn't know you are an actress!
hugs, Nettie
Beauuuuutiful!!!!!!! What an awesome technique and thanks for the tutorial too! I think even I can do this one. LOL. Hugs,
Well aren't you the clever one! I love this technique and the finished ATC you have posted is beautiful. Thanks so much for sharing.
Wonderful tutorial on mulberry paper.
I cannot stop myself from buying 'just one more' package of the stuff. ;)
Beautiful, thanks for the tutorial;o)
Hi Linda!
THANK YOU so much for visiting my blog! I'm so glad you liked the mulberry paper collage tutorial . . . I understand PERFECTLY how you feel you need to purchase one more package of stuff!!! Me, too!! LOL!!!!!!!!
Great tutorial, and beautiful art!
wow I have loads of mulberry paper I never use anymore, I will use it up with this technique, many thanks for the great instructions
Thanks for the technique and the steps you used! I have a bunch of transparencies I rescued at the local flea market sitting collecting dust!
Great technique. Thanks for the tutorial. I am going to need to play some day soon!
Also thanks for the nice comment you left on my blog about the FEB MAT background. I really appreciate the feedback.
Simply gorgeous Michi! :)
Michi, this looks like a fun technique and I actually have all those items, so I don't have to purchase anything. Thanks for the tut.
Just gorgeous, Michi! Thanks for sharing your process. I will look at my mulberry paper in a new way, now!
i've never tried this--thanks for the great tips!
Post a Comment